


Last Updated: November 10, 2026
Quick Summary
To pull off a clean pizza launch without tearing, check that your dough passes the windowpane test, keep the middle slightly thicker than the rim, and dust the peel with semolina right before building. Give the peel a gentle shake first: if the pizza moves, slide the peel back while the pizza stays put.
- Cold dough tears at the edges, so let the ball sit at room temperature 45-60 minutes before shaping.
- Hold the stretched round up to a light; any translucent patch is too thin and will split.
- Semolina is coarser and rolls under the dough like tiny ball bearings to help the slide.
- Seal small tears with a gentle pinch and re-shake the peel before committing to the launch.
- Replacement tarps for the ElitePeel sliding pizza peel cost $17.99.
Table of Contents
Why Pizza Tears on the Launch (and Where It Actually Starts)
A tear almost never happens at the moment you think it does.
At ElitePeel, we hear the same story from home cooks again and again. The pizza looks perfect on the peel.
Here's what most guides get wrong. They treat the launch as a single skill.
Below, we'll walk through each link in order, so you know exactly where yours is failing.
When Pizza Dough Won't Stretch Without Tearing: Fix the Gluten First
If your pizza dough won't stretch without tearing, the gluten is usually underdeveloped or over-relaxed. Gluten is the protein network that gives dough its stretch. Weak gluten rips. Tight gluten fights back and shrinks.
A common mistake is blaming your hands. In practice, the dough ball is the problem. Under-kneaded dough tears in the middle. Dough that sat too long turns slack and sticky.
Try this order of checks:
- Did the dough pass a stretch test before you shaped it?
- Has it rested long enough to relax?
- Is it at room temperature, not fridge-cold?
The Windowpane Test and Other Readiness Checks
The windowpane test is the simplest gluten check. Stretch a small piece of dough between your fingers. If it goes thin enough to let light through without ripping, the gluten is ready.
Do this before you ever reach for the peel. A dough that fails the windowpane test will tear on launch no matter how careful you are.
Other quick readiness checks:
- Poke test: a floured finger pressed into the ball should spring back slowly.
- Stretch test: the dough should pull to 8-10 inches without fighting.
- Temperature check: the ball should feel cool, not cold.
If your dough is sticky and slack, it often needs a different fix than weak dough. Our guide on how to fix sticky pizza dough in 5 simple steps covers the step-by-step repair.
Stretching Pizza Dough for Beginners: Even Edges, No Thin Spots
Even stretching is the difference between a clean launch and a blowout. Thin spots tear first because there's no dough left to hold the toppings. The fix is not to pull harder or softer, it's to keep the thickness even from rim to center and to stop before the middle goes translucent.
For stretching pizza dough for beginners, the hands-off approach works best. Let gravity do the work. Hold the dough by the rim and let it hang, rotating slowly. Pull gently. Never yank.
Measurable Readiness Checks Before You Stretch
Use these checks in order to confirm the dough is ready:
- Windowpane test: stretch a small piece between your fingers. If it goes thin enough to let light through without ripping, the gluten is developed enough to shape.
- Poke test: a floured finger pressed into the ball should spring back slowly and leave a shallow dent. A fast rebound means tight gluten; a dent that stays means over-proofed dough.
- Stretch test: the dough should pull to 8-10 inches without fighting. If it snaps back, rest it 10-15 minutes and retest.
A dough that passes these checks is far less likely to tear under moderate hand pressure.
How to Detect and Avoid Thin Spots
Thin spots are the launch killer because they have no structural reserve. Check for them before the dough reaches the peel:
- Backlight check: hold the stretched round up to a window or overhead light. Any patch you can see light through is too thin and will tear under topping weight.
- Edge thickness check: pinch the rim. It should feel consistently thicker than the center, roughly a finger's width.
- Sag check: lay the round over your knuckles. A center that sags under its own weight is over-stretched.
If you find a thin spot, do not stretch further. Push the dough back toward the center with your fingertips to redistribute thickness, then recheck. Over-stretching is just as bad as under-stretching: a dough pushed too wide gets paper-thin and fails on the slide.
Fix any thin patch on the work surface rather than on the peel.
Why Uneven Thickness Causes Launch Tears
Keeping the middle slightly thicker than the rim generally helps the dough hold together during the slide.
For stretching pizza dough for beginners, the hands-off approach works best. Let gravity do the work. Hold the dough by the rim and let it hang, rotating slowly.
Watch for these trouble signs:
- A patch you can see light through
- Edges that keep springing back
- A center that sags under its own weight
Over-stretching is just as bad as under-stretching. A dough pushed too wide gets paper-thin and fails on the slide.
The Step-by-Step Launch Sequence That Prevents Tears
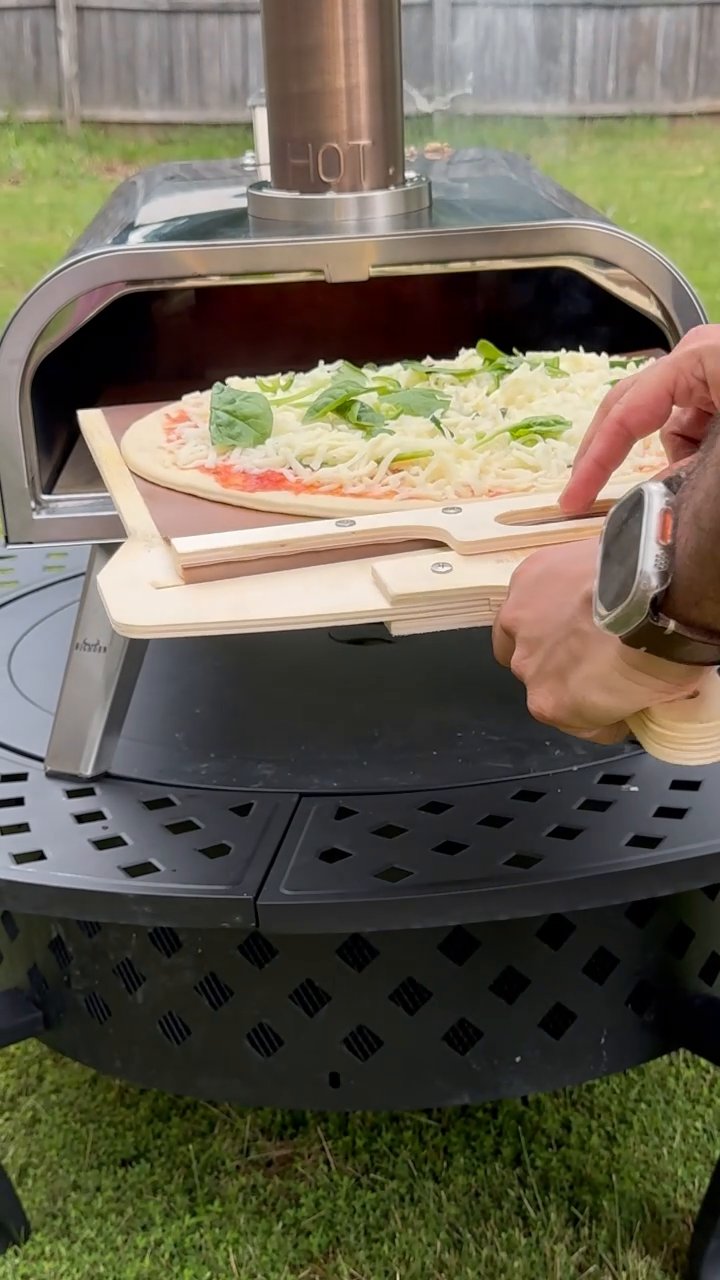
A pizza launch is a sequence, not a shove. Follow these steps in order to launch the pizza with the ElitePeel Sliding Pizza Peel, and help the pizza slide right off.
-
Pick up the pizza. to pick up your pizza start with the slide handle forward. Holding the slide
handle steady, slide the ElitePeel under the pizza by moving the main handle under the pizza
- Open the oven door fully. You want a clear, straight path in.
- Line up the peel with the back of the oven floor.
- Tilt to a slight angle and touch the far edge of the ElitePeel to the stone.
- Gently slide the peel back out from under the pizza while holding the slide handle in place with your hand or tongs.
- Withdraw smoothly. Don't jerk the peel out.
How to Repair a Tear Before the Pizza Hits the Oven
A small tear doesn't have to ruin the pie. Catch it before launch and you can often save it. Press the edges of the rip together gently and pinch to seal.
If the tear is large or the dough is soaked with sauce, stop. A wet tear won't seal. Slide the pizza back onto a floured surface, patch it, and re-dust the peel.
Repair rules to remember:
- Seal small tears with a gentle pinch
- Never stretch a torn spot, it spreads
- Re-check the slide after any repair
Troubleshooting by Cause: Stuck Spots, Shrinkage, and Topping Weight
Launch problems often trace back to a single cause. The table below matches symptom to likely fix; work through the checks in order to avoid chasing the wrong one.
Symptom |
Likely Cause |
Fix |
|---|---|---|
Dough sticks in one spot |
Damp peel or too little dusting |
Dry and re-dust the peel |
Pizza shrinks on the peel |
Dough too tight or cold |
Rest longer, warm up the dough |
Toppings slide and tear dough |
Too much sauce or heavy toppings |
Lighten the load, drain toppings |
Dough sags and folds |
Over-stretched thin center |
Keep the middle thicker |
Whole pizza won't move |
Peel too warm or over-floured |
Cool the peel, even out the dusting |
The Diagnostic Sequence
Work through these checks in order before you touch the peel. Each one rules out a cause so you don't chase the wrong fix.
- Check dough temperature first. A cold ball tears at the edges and shrinks on the peel. Let it sit at room temperature 45-60 minutes before shaping. If it's still cold in the center, it's not ready.
- Check gluten development. A dough that fails the windowpane test will tear regardless of technique. Rest it longer or knead more.
- Check thickness evenness. Backlight the round. Any translucent patch is a thin spot that will split.
- Check topping load. Wet sauce, heavy cheese, and watery vegetables add weight that drags on the peel and pulls the dough apart.
- Check peel condition last. A damp or over-floured peel is the easiest fix but the most commonly blamed cause.
How to Repair a Tear Before Launch
A small tear doesn't have to ruin the pie. Catch it before launch and you can often save it. Press the edges of the rip together gently and pinch to seal.
If the tear is large or the dough is soaked with sauce, stop. A wet tear won't seal.
Repair rules to remember:
- Seal small tears with a gentle pinch
- Never stretch a torn spot, it spreads
- Re-check the slide after any repair
After any repair, re-shake the peel to confirm the pizza still moves before committing.
Topping Weight and Moisture
Topping weight is the sneaky cause. A heavy pile of wet sauce, cheese, and veg pulls the dough down and drags on the peel. Less is more on launch day. Drain watery toppings, apply sauce in a thin layer, and keep the total load light enough that the dough doesn't sag when you lift the peel.
Heavily topped pizzas can tear more easily, so if loaded pies tear, reducing the load is worth trying first.
Pick a Peel That Ends the Guesswork
You can control dough, dusting, and technique. The one variable you can fully remove is the peel itself. That's where a sliding peel changes the game.
The ElitePeel sliding pizza peel is designed to help you achieve flawless pizza launches. Its sliding design is intended to prevent toppings from sliding off and to help crusts keep their shape.
A few things we stand behind:
- A 30-day money back guarantee
- A 1-year warranty on materials and workmanship
- 1% of the purchase amount donated to provide meals for children in need
Before you buy, our honest take on whether a sliding pizza peel is worth it answers the questions most shoppers ask. And when your non-stick tarp wears down, replacement tarps ($17.99) are available for the ElitePeel sliding pizza peel.

The launch is the moment every pizza maker fears, but it doesn't have to be.
Frequently Asked Questions
Why does my pizza dough tear when I transfer it to the oven?
Most tears come from three places: weak gluten from under-proofed or under-kneaded dough, too much topping weight on a thin center, or the dough bonding to the peel before launch. Check that your dough passes a windowpane test, keep toppings light and dry, and give the peel a gentle shake before you open the oven door. If the pizza does not slide freely, fix it on the peel, not mid-launch.
How much flour or semolina should I use on a pizza peel?
Use enough to coat the peel so the dough moves freely, then tip off the excess. A thin, even dusting of semolina or a 50/50 mix with white flour gives the dough tiny rollers to slide on. Too much flour leaves a burnt, bitter layer on the crust base; too little causes stuck spots. Shake the peel after every topping addition to confirm the pizza still moves.
Can you launch a pizza with a metal peel?
Yes, but metal peels behave differently from wood. They transfer heat fast, so dough can start setting on the peel if you take too long to top and launch. Keep the topping process under a couple of minutes, dust lightly, and shake often. The ElitePeel sliding pizza peel is designed for controlled transfers.
Should you stretch pizza dough on the peel or on the counter?
Stretch on the counter, then move the shaped dough onto a floured peel. Stretching on the peel pushes flour and toppings into the dough and makes stuck spots more likely. Once the skin is on the peel, work quickly: sauce, cheese, and toppings, then a gentle shake to confirm it slides. If it sticks, lift the edge and add a pinch of semolina under the stuck spot before trying again.
